
Our unique Lakeland Farm Arena near Windermere is perfect for things to do in the Lake District. Our choice of activities is the perfect opportunity for you experience a little bit of traditional Lakeland farming life and is great for the whole family.
"Thanks for a great time, the children really enjoyed it and learnt loads"
Pamela Friel
Arena Farm Experience Show
The Farm Experience show is great for the whole family and gives an insight into different areas of farming life.
Available Wednesday to Sunday at 11am
Approximately 45 mins.
** Available to Groups of 25 or more only **
£12 Adult / £4 Child over 4 yrs
Booking essential
Call to book – 01539 324846 / enquiries@lakelandfarmvisitorcentre.co.uk
‘Walk & Talk’ Farm Experience Show
Similar to the ‘All Round’ Show, join Isaac for a walk & talk as you meet the animals in the fields and their pens. Learn about farming in the Lakes today and the challenges the industry and local farmers are facing today and watch our extremely well trained sheep dogs as the demonstrate their skills.
Available Daily at 11am
Approximately 45 mins.
** Available to Groups of 25 or more only **
£12 Adult / £4 Child over 4 yrs
Booking essential
Call to book – 01539 324846 / enquiries@lakelandfarmvisitorcentre.co.uk
Lamb Feeding
Enjoy feeding some of our extremely cute lambs. This is a great activity for the kids … and the big kids too!
Available from Easter to till August approx.
9:30am, 11:45am & 3:00pm
Price £8.50 per person (minimum 2 people per session)
Booking essential
Call to book – 01539 324846 / enquiries@lakelandfarmvisitorcentre.co.uk
Archery
Available from 28th May to 5th June
Try your hand at our Field Archery, a great family activity.
Max 6 people. Min age 7 years
Approximately 45 mins
Price £12 per person
Booking essential
Call to book – 07503 054 762
Wool Spinning
Find out how our Herdwick wool is prepared for spinning. The fleeces are laid out and sorted, before being carded into ‘rolags’ for spinning. Watch as the fleece is turned into yarn, ready for knitting or weaving into strong fabric.
During the session you will learn how to spin on a drop-spindle, then a spinning-wheel, and turn the yarn into a skein, ready to take home with instructions on finishing the yarn and materials to create a small project.
The experience is great for all ages and abilities.
Available – Saturday 10am
Approximately 2 hours (not inc. lunch)
Price £100 inc. breakfast or lunch for 2 people
Booking essential
Call to book – 01539 324846 / enquiries@lakelandfarmvisitorcentre.co.uk
Dry stone walling is a traditional farming skill that has been passed down through the generations for 100’s of years, and is important for stock control and safety, and have marked the Lake District landscape throughout history.
What is a dry stone wall? It’s simple … it’s a wall built without any cement, and is held together by carefully choosing the placing the right stones, using the right technique. A well-built dry stone wall should last a generation and many in the Lakes have been standing for a lot longer.
Ever wondered what’s involved with this traditional skill? With our expert-lead dry stone walling experience, you can find out. Isaac has been building and mending dry stone walling on Lakeland farms his whole life.
The experience is great for all ages and abilities and is a great family activity or team building event.
The activity is done inside at our purpose-build walling space. At the start of the session you will receive walling tuition and shown how to wall and the steps involved to complete a wall gap. Then, with the knowledge you will set off to complete your own wall gap. You will be left with the challenge then you can receive feedback as you finish.
Times available – 2pm
Price: £100 for 2 people inc. breakfast or lunch
Booking essential
Drystone walling is an important skill to have on any Lakeland farm as the walls are important to keep livestock safe. Join our expert waller and learn the basics and build your own drystone wall. This experience is great fun for all ages and abilities.
The technique for building a decent dry stone wall hasn’t really changed for hundreds of years. People may have different names for some of the key elements, but fundamentally they are the same, and have the same job.
1 – Prepare the area
As when building anything, a good strong foundation is key. Prepare the ground and mark out the area that you’ll build the wall on with string or chalk lines. Sort your stones into piles of large, medium and small stones.
2 – Lay your foundations
Dig a trench that will hold your foundation stones. I doesn’t need to be too deep 6 – 12″ should be enough. Lay your largest stones as your foundation, as they will support the wall. Fill any gaps with smaller stones.
3- Building the layers (courses)
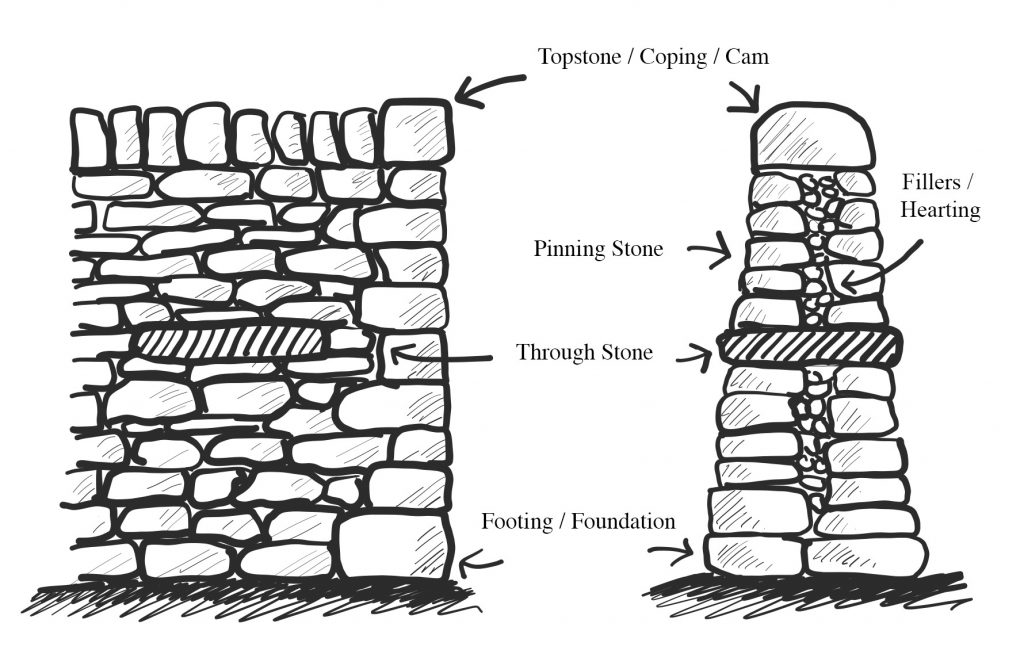
Your wall should be built to form an A shape, you may want to use an A-frame as a guide. Build your layers up, laying your ‘pinning’ stones flat. Always make sure the stones touch and cross joins in the layer below.
4 – Build strength into your wall
To keep your wall stable so it will last a lifetime, you need to fill any gaps with smaller stones (fillers / hearting) which will bind the wall together. As the wall rises, you will need to place ‘through stones’ into the wall, at regular intervals. Through stones extend the entire width of the wall and will hold both sides of the wall together.
5 – The finishes touches
The Topstone (also called Coping or Cam Stones) are places on the top of the wall and should be large flat stones. These are laid upright and should span the width of the wall
Please get in touch with us, we’d love to hear from you or if you’d like to discuss anything – 01539 324846
The Lakeland Kitchen is now open every Saturday & Sunday Night .. click below for more!
